
Press fit connectors and pins have become increasingly popular recently, for a variety of reasons. Rather than repeat these reasons, which can easily be found with a quick search of the internet, let’s discuss the design and assembly challenges associated with press fit parts.
Design
In order for the assembly of a press fit component to be successful, it must first be designed for success. This starts with something as simple as defining that an area of your PCB will have a press fit connector installed in it. Why is this necessary? Because when it comes to press fit components, a tighter tolerance must be achieved with the plated-thru-holes in order to achieve the appropriate contact with the mating press fit pins. Think about it, if these holes were too large, and there was no solder holding them in place, then the pins could potentially slide out of their holes after repeated thermal cycles or mechanical stress from daily use.
The best way to communicate this requirement is to add this information in an extra layer of your design and then make sure to export that layer along with your other gerber data before sending it to us. This will help inform the PCB fab to pay special attention to this region to make sure that the tolerance of the drill is held precisely.
Additionally, when designing your circuit board, you need to make sure there is sufficient clearance around the press fit part to allow an anvil to be pushed up against the bottom of the PCB where the component is. If there is some kind of tall SMT component nearby, it might be impossible to get an anvil to fit properly without coming into contact and thus destroying this nearby SMT component.
Finally, you’ll want to double-check the footprint design your using to make sure it meets the requirements of the manufacturer of the component. Some manufacturers might require multiple layers of annular rings of copper in order to properly support the inserted pins.
Assembly
The press fit assembly process can be extremely destructive. If the proper tooling is not in place, it’s not uncommon to destroy the PCB in the press fit process.
Press
To begin with you will need to make sure you have a press with enough height clearance to handle the press fit component. Some press fit connectors are very tall and may not be compatible with basic arbor presses. Some connectors are very large and require significantly larger presses, so it’s always good to check with your manufacturer ahead of time to make sure they have the appropriate equipment for the application.
Press Head
If the component does fit the press you’re using, then you will need to make sure to have the appropriate press head for pushing against the component. Some components can be pushed with a flat piece of steel, whereas other components may need a special press head supplied by the manufacturer. Usually this will be defined in the manufacturers datasheet.
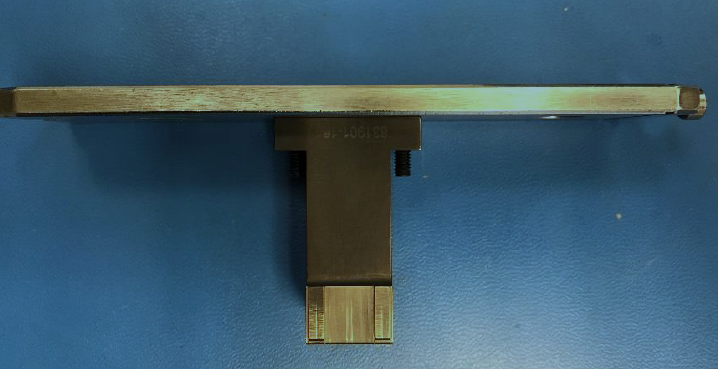
Press head designed specifically for its associated component
Anvil
Arguably the most important aspect of the press fit process is the anvil. When you press this component in place it is going to want to blow out the bottom of the PCB and destroy the entire assembly. Typically, without a proper anvil you will either not press the pins all the way in completely, because you’re supporting the entire bottom side of the PCB with a flat piece of steel, or you will destroy the PCB because you’re only holding the outside of the PCB up with some simple tooling pins or other standoffs.
The anvil is usually not supplied by the manufacturer of the component (unlike the press head). This means it will need to be custom engineered for your specific PCB design. Most shops that specialize in PCB tooling can help you with this design. Or you can request your assembly shop to work with a tooling specialist to get this designed and made for you.
Tooling
Finally, you need to make sure that the circuit board, the component, and the anvil all line up with each other properly, and repeatably, in order to achieve consistent results and get a high yield. This is usually accomplished with custom tooling that’s designed for your specific assembly. It will hold the PCB in place while the pressing operation is performed. It’s actually quite common to integrate the anvil into this custom tooling, but not always. Depending on the application you can sometimes get by with just an anvil, but this should be reviewed by the engineering staff at your assembly shop.
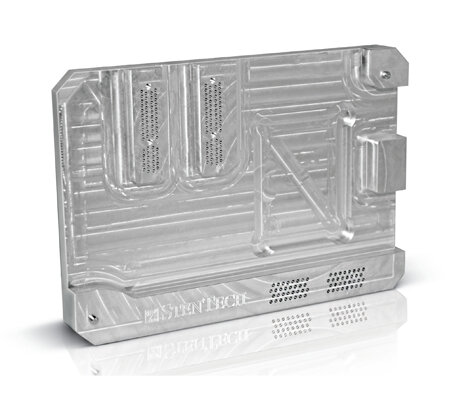
Tooling designed specifically for the PCB that gets the press fit component
If your next PCB design will require press fit components, please reach out to us ahead of time before placing an order for a design review. This will help prevent any sort of frustration later on in case the design of the assembly is incompatible with the requirements of the press fit process.
If you have any questions at all, please reach out to us at info@worthingtonassembly.com or you may email the author of this article at cdenney@worthingtonassembly.com.